Tracking Time Spent (Legacy)
- Aaron Sakievich (Unlicensed)
- Kenny Teves
We have included a timer for those clients who desire to pay their reviewers by time spent, rather than other metrics. Linguists can also use this tool for their own records.
The timer:
- Tracks the amount of time spent across all segments, as well as noting how much time is spent on each segment.
- Tracks the User ID for time spent, so that if multiple users are working on a task, they will each be paid according to the time they spent on the task.
- Pauses any time the Workbench is closed or a segment is saved.
- Will resume once the user manually starts the timer or begins typing within a segment.
- Automatically stops when the user marks the task complete.
Track Time Tool
To use the timer:
- Open the workbench.
- Select Track Time from the Tools drop down menu (or use the shortcut Alt + Shift + F9)

- Press the Play icon to manually begin the timer or simply type within the segment to begin the timer.
- Select the More icon to view all time intervals for that segment.
Generate Time Card Report
Using bulk actions from the Task List you can generate a Time Card Report that will give you a record of all the tasks you have complete and the amount of time you spent on them. This report can be based on selected tasks or a date range.
Selected Tasks
Use the status filter on the task list to get a list of completed and late tasks.
Although filtering by status is recommended, you can simply select a group of tasks and then run the report. Tasks that are not complete or late will not be included in the report. To learn more about statuses view the documentation here.
- Manually check the boxes next to the tasks you want to include in the report or use the bulk selector.
- Open the bulk actions menu and choose Generate Time Card Report.
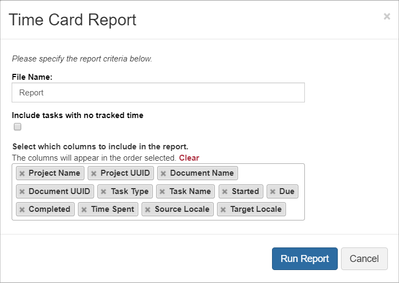
- Provide a file name.
- Decide whether or not to include tasks that did not include tracked time.
Select which columns to include in the report. Also, choose which order they appear in by dragging and dropping the fields.
The columns you select and the order in which they appear are "sticky," meaning you will not need to configure these columns every time you run this report. It is recommended to at least include Task Name and Time Spent.
Note that if you do not configure columns, the downloaded report will not contain any data. Also, if none of the tasks you select are complete, the report you run will not contain any data.
- Select Run Report.
- You will see a notification telling you that the report is being generated. It will include a link to the process queue where you can download the report as an XLSX file.
Date Range (No tasks selected)
- Open the bulk actions menu and choose Generate Time Card Report.
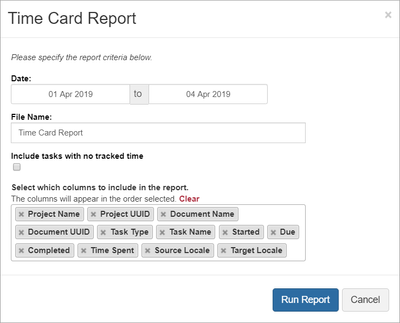
- Give a date range.
- Provide a file name.
- Decide whether or not to include tasks that did not include tracked time.
- If you have not yet configured your columns, then do so now.
- Select Run Report.
You will see a notification telling you that the report is being generated. It will include a link to the process queue where you can download the report as an XLSX file.
Only completed or late tasks will be included in the report.
Adjusting Time Spent
If you realize you have made a mistake when tracking time, you can manually adjust the amount of time you have spent on a task if the Project settings allow you to do so. If it does not appear that you can adjust the amount of time you have spent on a task, please contact your project manager and request them to change the time spent on the task.
Even if your project manager has enabled you to adjust your time spent, you will no longer be able to adjust the time spent once the task has been marked complete.
Adjusting time from the Workbench
If you are working within the task and realize that perhaps you let the timer run while you were away from your desk or the time does not reflect your work for any other reason you may adjust it while you are still in the Workbench.
The timer displayed in the workbench is simply powered by the browser, which can be affected by connectivity or other issues. However, the actual amount of time you spend on a task, from the time you start the timer to when it stops when you mark the task complete is recorded using an accurate server.
The time displayed on the browser is updated every 55 seconds to adjust if it has become inaccurate. Please rest assured that if you lose connection to the internet or for whatever reason the time displayed in the UI looks inaccurate, the actual time spent stamped on the task will be 100% accurate. Do NOT adjust your time due to the timer appearing inaccurate in the browser.
To adjust your time spent from the Workbench:
- Open the Time Spent tool from the Tools drop-down in the Workbench.
- Select the More icon.
- If the timer is running, stop the timer. You can only adjust your time spent if the timer is not currently tracking your time.
- Select the Edit button.
- Enter the real time you have spent on the task in hours, minutes, and seconds. Adjusting time does not work by you adding or subtracting time. It takes the real time you enter and then adjusts by comparing the time it has tracked to the time you have entered. If the real time you enter is less than the time it has tracked, it will show the amount of time it has subtracted. If your time is greater than the time it has tracked, it will display the amount of time it has added. (i.e. If I entered I spent 5 minutes, but it has only tracked 4 minutes then the Time Adjustment will display 00:01:00.)
- Select Save.
- Your adjusted time will be shown. You can adjust your time spent as many times as is necessary.
Adjusting time from the Task List