Language-Specific Translation Profiles (Drupal 7)
![]() To update to the latest version of Drupal, click here.
To update to the latest version of Drupal, click here. ![]() Before you can create language specific profiles, be sure to enable at least one target language on the translation Dashboard.
Before you can create language specific profiles, be sure to enable at least one target language on the translation Dashboard.
Now you can customize any translation profile with Drupal's new language specific translation profiles. Language specific profiles let you specify which workflow to use - by target language - within a translation profile.
A language specific profile lets you …
- Tailor your translation settings when translating into specific languages.
- Add extra translation steps for high value languages
- Set up machine translation for low value languages (e.g. fringe markets)
Here’s how it works:
- Create a workflow in Enterprise
- Go into a Drupal translation profile
- Select a target language
- Apply the new workflow to the selected target language
When Would I Use a Language Specific Translation Profile?
- Situation: You want blog posts machine translated into every language except for Korean.
- Solution: Go into the translation profile you’re using for blog posts, click on Korean, and select “Disabled.”
- Situation: Because Asian characters often shift text position, you want a graphic designer to review all of your Korean marketing materials.
- Solution: Create a workflow with an extra review step, and then apply it to the Korean section of your translation profile.
How Do Language-Specific Profiles Work?
You can set up language specific profiles - for as many languages as you like - in just a few steps.
- First, enable language specific profiles.
- Next, create the workflow in Enterprise for each target language you want to customize.
- Then apply the new workflows to the language(s) of your choice.
Enable Language Specific Profiles
Start by enabling Language Specific Profiles in Drupal.
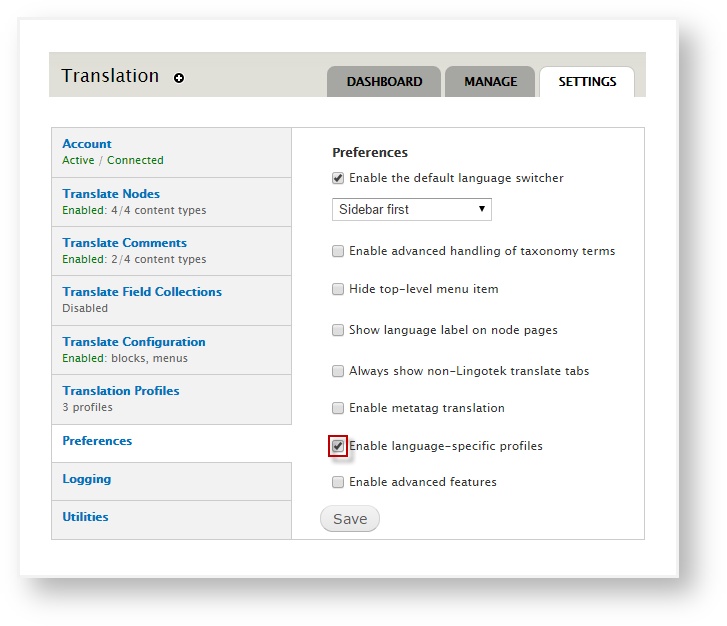
To enable Language Specific Profiles, access the Translation Settings tab.
1) Log in to Drupal as an administrator.
2) Go to Drupal’s main admin menu and select Translation.
3) Choose the Settings tab (upper right). Then from the left sidebar, choose Preferences.
4) Check the box next to Enable language-specific profiles.
5) Click Save.
Create an Enterprise Workflow
Go into Enterprise and create the custom workflow(s) you would like to apply to content in specific target language(s).
Create a Language-Specific Profile
After enabling Language Specific Profiles in Drupal and creating special language-specific workflows in Enterprise, you can apply them to translation profiles for the target languages of your choice.
To customize a translation profile,
- Access the translation profile.
- Choose your preferences for each target language.
- Select which workflow to use for each target language.
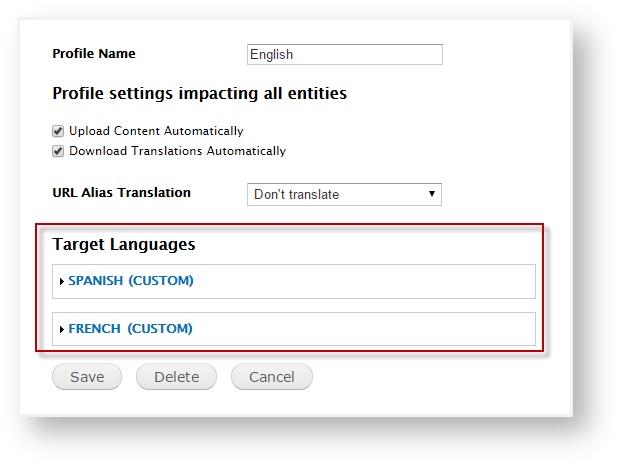
Access the Translation Profile
1) Go to the main menu and select Translation.
2) Choose the Settings tab (upper right). Then from the left sidebar, choose Translation Profiles (left menu)
3) Click the gear icon to edit an existing translation profile.
Choose translation preferences for each language
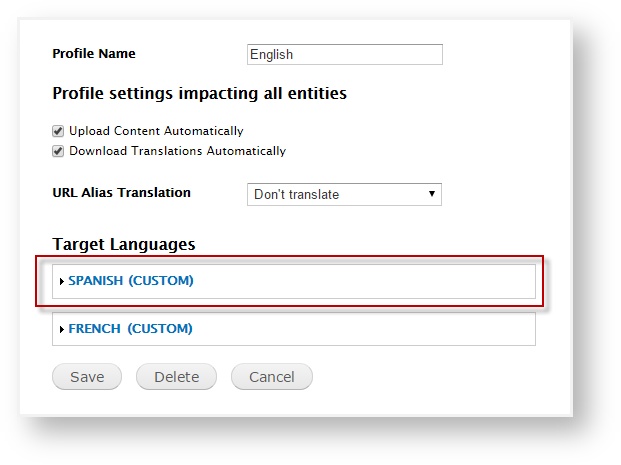
4) Scroll to the bottom of the page.
5) Under Target languages, click the link for the language you would like to customize.
6) Then choose an option from the drop down menu.
These options will tell the connector whether to use the translation profile’s overall settings or not.
- Inherit Default Settings – Content will be translated using the default settings chosen for the overall translation profile.
- Use Custom Settings – Content in this language will use special custom settings – as you choose (see below).
- Disabled – Do not use this translation profile for content in this language.
Custom Settings
7) If you would like to modify the settings for a single language, go to the drop down menu and select Use Custom Settings.
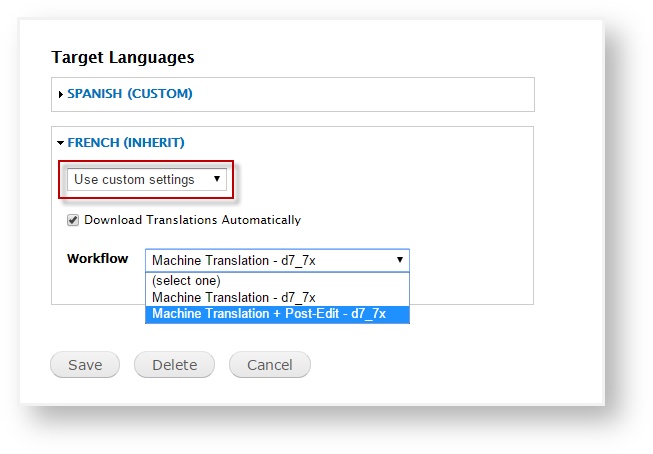
- Depending on your preferences, check (or uncheck) Download Translations Automatically.
- Then scroll to select the workflow you would like to use (for that language)
- Scroll to the bottom of the page and click Save.
Once your changes are saved, the new workflow will be applied to all future content using the translation profile.
![]() Tip: If you need to apply a language-specific profile to documents that have already been uploaded, disassociate the documents that need the new profile, and then re-upload them to Enterprise.
Tip: If you need to apply a language-specific profile to documents that have already been uploaded, disassociate the documents that need the new profile, and then re-upload them to Enterprise.