Add documents to a project by dragging and dropping them or by pasting in plain text.
Add Documents to a Project
To add documents to a translation project,
Open a Project. (Open Projects from the sidebar).
- Click to select the name of the project in which you would like to add documents or simply drag and drop files from your device over the desired project.
Select Add Documents and then either drag and drop files to the page, or browse for the desired files in your desktop. You can also drag and drop files from your device anywhere on the Document List and the Add Documents page will open.
- You can see all the documents you have added in the sidebar. Selecting a document in the sidebar will allow you to view and adjust the import settings of the document. To add more documents on the Add Documents page, then drag and drop more files on the page or choose Select Files.
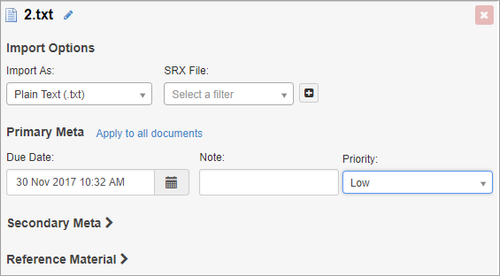
- If desired, you can adjust the Import Options.

- Import As - Lingotek will autodetect the filetype that you have added based on the file extension. However, if necessary, you can change how the file is imported.
Importer Version - There is a default Importer Version assigned to each file-type supported by Lingotek TMS. The default will be auto-selected.
- Advanced Settings - Select Configure to add custom FPRM, Secondary FPRM, and SRX files that should be used when importing documents to Lingotek TMS. If you leave the advanced settings blank the import process will use Lingotek's default settings.

Tag Simplification - For Importer Version m38 and above, how tags are handled will be determined by the chosen FPRM and SRX filters. If m0 is the importer version, you can choose whether or not to simplify tags by checking the box next to Preserve white-listed format tags surrounding segments.

We recommend that all custom configurations be set up using Import Templates in the Project Settings page. This allows content managers to simply add the documents without adjusting any of the settings.
- Optionally, add metadata (e.g. due date, author name) to the document.
- If needed, adjust the Document Settings. Then click Upload.

As the documents load, an Uploaded icon displays next to each document.
Errors are noted with a Failed icon.
- Once the files upload, click Done to continue working.
- The Processes Widget will open and you can monitor the document import process there or open the Process Queue.
- When the document import process completes, the documents will appear in the Document List.
InDesign Packages
The Add Documents page will detect when you upload a zip file and it will give you two import options.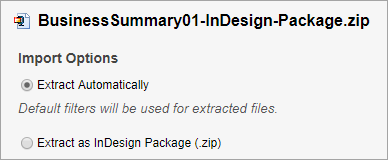
- If you are uploading a normal zip file, you can choose to Extract Automatically which will extract each file in the zip and create a document for each file.
Choose to Extract as InDesign Package (.zip) if you are uploading an InDesign package. This option will upload the INDD file, fonts, and images to the Adobe Cloud to be converted into a PDF for In-Context translation. This option is available to all enterprise clients.
Adobe does not provide insight into how long it will take to complete processing INDD files. The progress of the file upload will stay at 10% until Adobe returns the file to our system. You can track the progress in the new Processes Widget.
- Please ensure that the InDesign package that is being uploaded follows these guidelines:
- The INDD file should be in the package root folder.
- The Links and Document fonts folders should be in the package root folder with the INDD file.
- The package root folder should only contain one INDD file.