Email notifications help you monitor workflow tasks automatically and simply.
Automatic notifications can be sent when:
A workflow phase starts
A workflow phase finishes
The TM Leverage or MT is complete
A translation meets a certain percentage of completion
To set up an email notification, go into a workflow and create a rule. In the rule, select recipients, add a custom message, and choose what should trigger the email.
Adding Email Notifications to a Workflow
To add an email notification workflow rule,
Open a workflow. Select Templates in the sidebar, open Workflow Templates and select the desired Workflow.
Select a phase. Click on the workflow phase where you wish to add the notification.
Open the Configuration tab. This will open the workflow configuration screen.
Add the rule. Scroll down to the Rules section and click the + Add Rule icon.
Create the rule.
Using the drop-down menus, select the condition that will automatically trigger the email.
Under Take these action(s), select send an email notification to {the desired user, email address, or recipient variable}.
Compose the message. Click edit message to customize the message that will be sent.
Save the message; save the rule.
Email Recipients
You can choose to send an email notification to TMS users, variables, and email addresses not stored in the TMS. See the full list below.
Addressee |
|---|
A Lingotek User |
All assigned translators – Sent to all assignees of the translation phase in the workflow. |
All assigned reviewers – Sent to all assignees of all review phases in the workflow. |
All project owners on the project |
All shared users on the project |
Previous phase's assignee |
Current phase's assignee |
Next phase's assignee |
All phase assignees on the target |
Author email – document metadata field |
Contact email – document metadata field |
Document creator – the person who uploaded the document |
An email address |
A team |
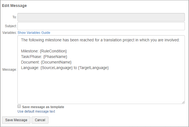
Customizing the email message
When creating an automatic notification, you can create your own custom message to accompany the notification.
To create a custom message,
Create a rule for email notification (instructions above) and then click the edit message link.
Type a default subject line and message.
Optionally add variables to automatically pull document information into the message (e.g. document name, source/target language).
Save the message, save the rule.
Working with Variables
Variables are a powerful and simple way to customize messages. For instance, use variables to automatically pull the document title, source/target language, etc. into the message. Below is an example of an email template using variables and of the message once it’s sent.
For a complete list of the variables, click the Variables Guide link above the message.
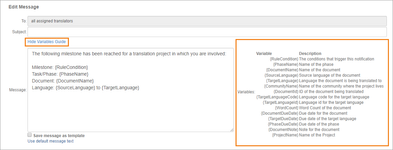
As you’re composing a message using variables, you can open the Variable Guide for reference. Just copy the variable name - complete with the brackets: “{}” - and paste it into your message. When the system sends the message, it will pull in the appropriate text for each variable.
You can send a test message to yourself if you would like to see how the variables will work in the finished message.
Choose from 16 Creating Automatic Email Notifications#variables, described below.
Variable | Description |
{CommunityName} | Name of the community where the project lives |
{DocumentDueDate} | Due date for the document |
{DocumentId} | ID of the document being translated |
{DocumentName} | Name of the document |
{DocumentNote} | Note for the document |
{PhaseDueDate} | Due date of the phase |
{PhaseName} | Name of the phase |
{ProjectName} | Name of the Project |
{ReferenceURL} | The Reference URL metadata field on a document |
{RuleCondition} | The conditions that trigger this notification |
{SourceLanguage} | Source language of the document |
{SourceURL} | The Source URL metadata field on a document |
{TargetDueDate} | Due date of the target language |
{TargetLanguage} | Language the document is being translated to |
{TargetLanguageCode} | Language code for the target language |
{TargetLanguageId} | Language id for the target language |
{WordCount} | Word Count of the document |
{WorkbenchLink} | Link to the phase in the Workbench |