Prerequisites
Before you can start receiving the benefits of the Vendor app, you need to make some changes to your environment in the Project Management app. Before you do so, please ensure the following steps have been completed in Vendor.
You have selectedOverview
With the Vendor application, organizations can access cost detail reports and invoices, as well as manage vendor information. In the TMS, a vendor is a language service provider (LSP).
This page shows how organizations can set up additional settings in the Project application to maximize the features of the Vendor app.
Prerequisites
The following are prerequisites that have to be completed before adjustments are made to the Project Management app. Work with your support team to configure these settings.
Select the currency that will be used
Project Management App
If the two steps above are complete, you can take a few simple steps to enable financial managementto manage finances in TMS.
You have at least one LSP listed in your Vendor Dashboard.
| Tip |
|---|
If you do not see any LSPs listed, or you wish to add more LSPs, please reach out to support@lingotek.com. |
Assign your vendors to the desired workflow phases.
Contact our Client Success team to start linking a vendor to your organization.Be assigned a rate chart. Your selected vendors are in charge of creating and maintaining rate charts which will be used for billing purposes in the future.
Rate charts are accessible on the Rate Charts page.
Enable financial management
After completing the prerequisites, you can now set up additional features in the Project Management and Vendor applications. Workflow Changes
Add changes to your workflow
If you have not created any workflows, use the documentation to create some workflowsfollow the steps on Workflow Templates to create a workflow. Note that to generate costs, the Vendor Management app requires your workflow workflows to include a a Leverage TM phase to generate costs.
info.
| Panel | ||
|---|---|---|
| ||
If you want to update a Project Workflow template on a project, note that existing documents will not be updated with new Vendor vendor assignments or marking mark the phase as billable. It will only apply to new documents. |
Make changes to the TM Leverage
TM Phase - You must add a new workflow rule to the Leverage TM Phase.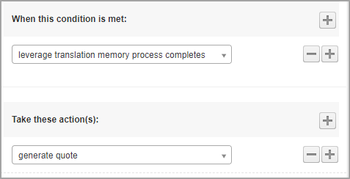
Condition -
phase
To make the changes to TM Leverage, follow these steps:
On the Projects page, select a project.
When the Project Summary page opens, click the Project Workflow tab, and then click the Leverage TM phase.
In the Rules section, click the Add Rule option to add a workflow rule with the following specifications:
Condition: leverage translation memory process completes
Action
: generate quote
Adding VendorsAny language pairs that will be completed by an LSP should have a vendor assigned. First, assign your default vendor and default billable status. For Custom Phases only, you also specify if time spent should be used to populate the billable hours of a phase.
 tip
tipClick Save.
Adjust billing details
To adjust the billing details of human translation and custom phases of a project, follow these steps:
On the Projects page, select a project.
When the Project Summary page opens, click the Project Workflow tab, and then select either a custom phase or a human translation phase.
Set up the following information in the Settings section:
Name - Enter the name of the phase.
Description - Enter the description of the phase.
Allow task check-out - Select Yes to allow task check-out for the applicable workflow phase.
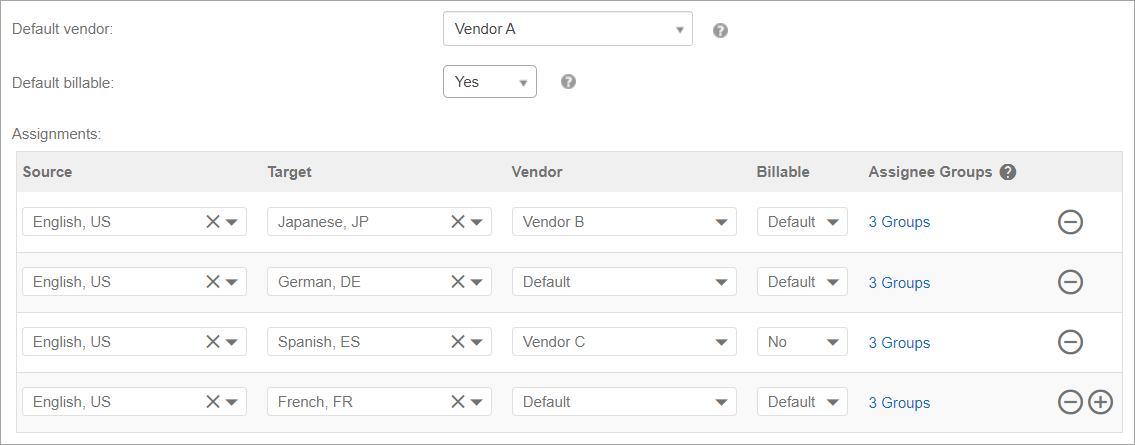
Assignments - in this table, enter the following details:
Source - Select the source locale or language.
Target - Select the target locale or language.
Vendor - Select the applicable vendor or language service provider.
Billable - Select whether the assignment is billable or not.
If you select Default, the assignment follows your default configuration found in the Default row.Billable Time Tracking - Select any of the following:
Default - Select this option to use your default configuration.
Use workbench time tracking - Select this option to use the workbench time for billing.
Manual entry on completion - Select this option to manually enter the billable time upon completion of the phase.
Assignee Groups - Click the groups link to open the Manage Assignment Groups window for an assignment.
Default vendor - Select the applicable vendor.
Note: If you select No Vendor Assigned from the Vendor list and your target vendor is Default Vendor, that target will have no assigned vendor.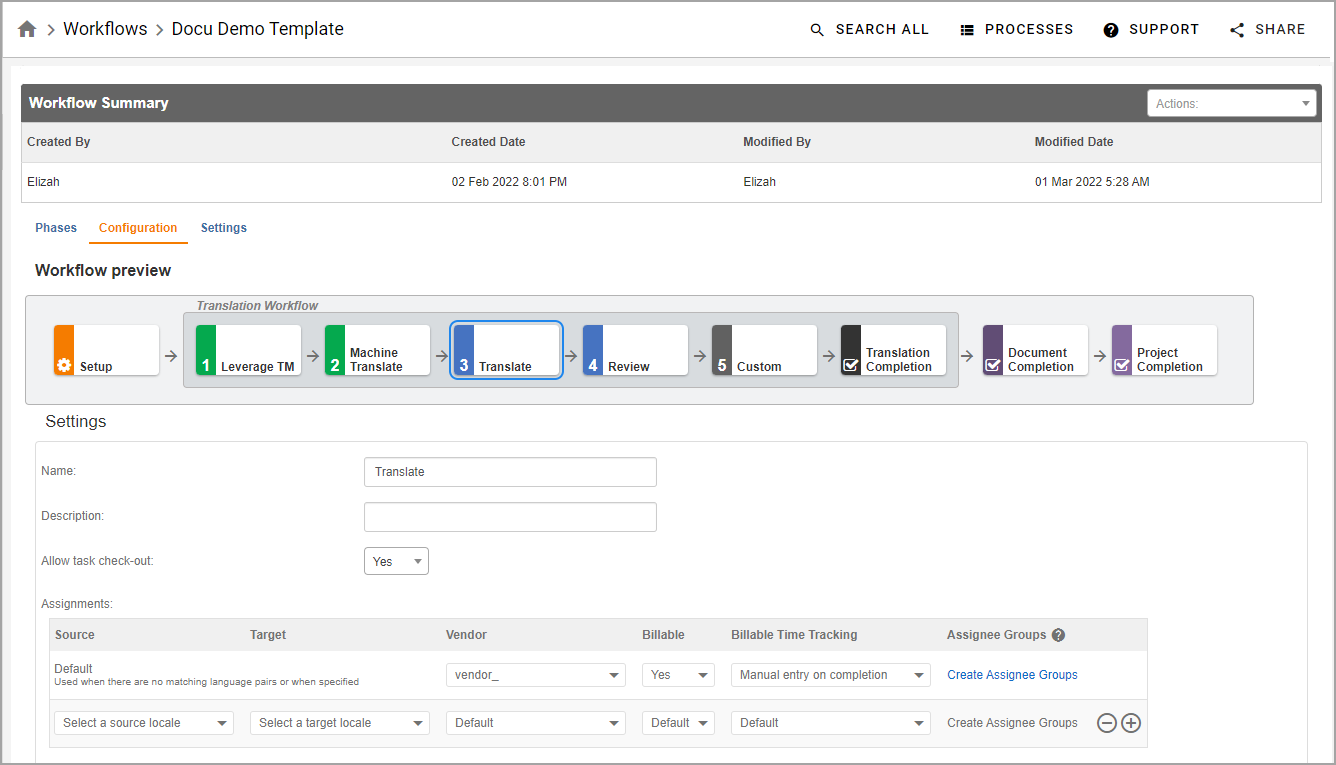
| Panel | ||
|---|---|---|
| ||
|
|
| Info |
|---|
The options in the Vendor column include:
Note that if your default vendor is equal to No Vendor Assigned and your target vendor equals Default Vendor, that target will not have a vendor assigned. |
|
Mark phases as invoiceable
The system automatically scans workflow phases that are invoiceable to include them in an Invoice, which you can find in the Vendor app. Note that only billable phases can be marked as invoiceable
and they become.
Phases are invoiceable in
one oftwo ways
.:
When the document
that belongs to
a phase has reached completion status.
When a billable phase is completed.
To mark phases as invoiceable, use the following rules on the phase:
mark phase as invoiceable
mark all previous billable phases as invoiceable
mark all billable phases as invoiceable
| Info |
|---|
These rules are not required. They can be used to let vendors |
invoice when their part in the workflow is done or to prevent bottleneck phases from slowing down the invoicing process. If they are not used, billable phases will be marked invoiceable when the document |
is completed. |
You can apply these rules on the completed translation |
phases of the workflow if you wish to let the vendor bill once the target |
is complete. |
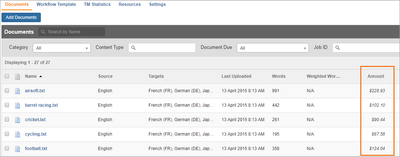
Amount Column
For your convenience, you will receive an estimate of the costs for phases, targets and documents in the Project application.
Review quotes in the Project Management app
You can review a quote for a document in the Amount column of the Documents tab.
Take note of the following details:
To view the quote in the Amount column, make sure to configure your columns in the document and targets list.
Phases billed by the hour will display the quoted cost using the quote settings in the matched rate chart. Those costs will be updated when the linguist or project manager enters the billable hours.
- Configure your columns in the document and targets list to view the Amount column.
If you hover
over cost estimateson a quote, you will see the cost information broken down by translation cost and project management fees.
Once
the a vendor runs
a final an invoice report
, the phases
, targets and documents in the report will be marked
and Invoicedinvoiced. The amount in the Cost column becomes bold and
show shows the final cost of the documents, targets, and phases. These phases
.
will no longer show up in future invoices.
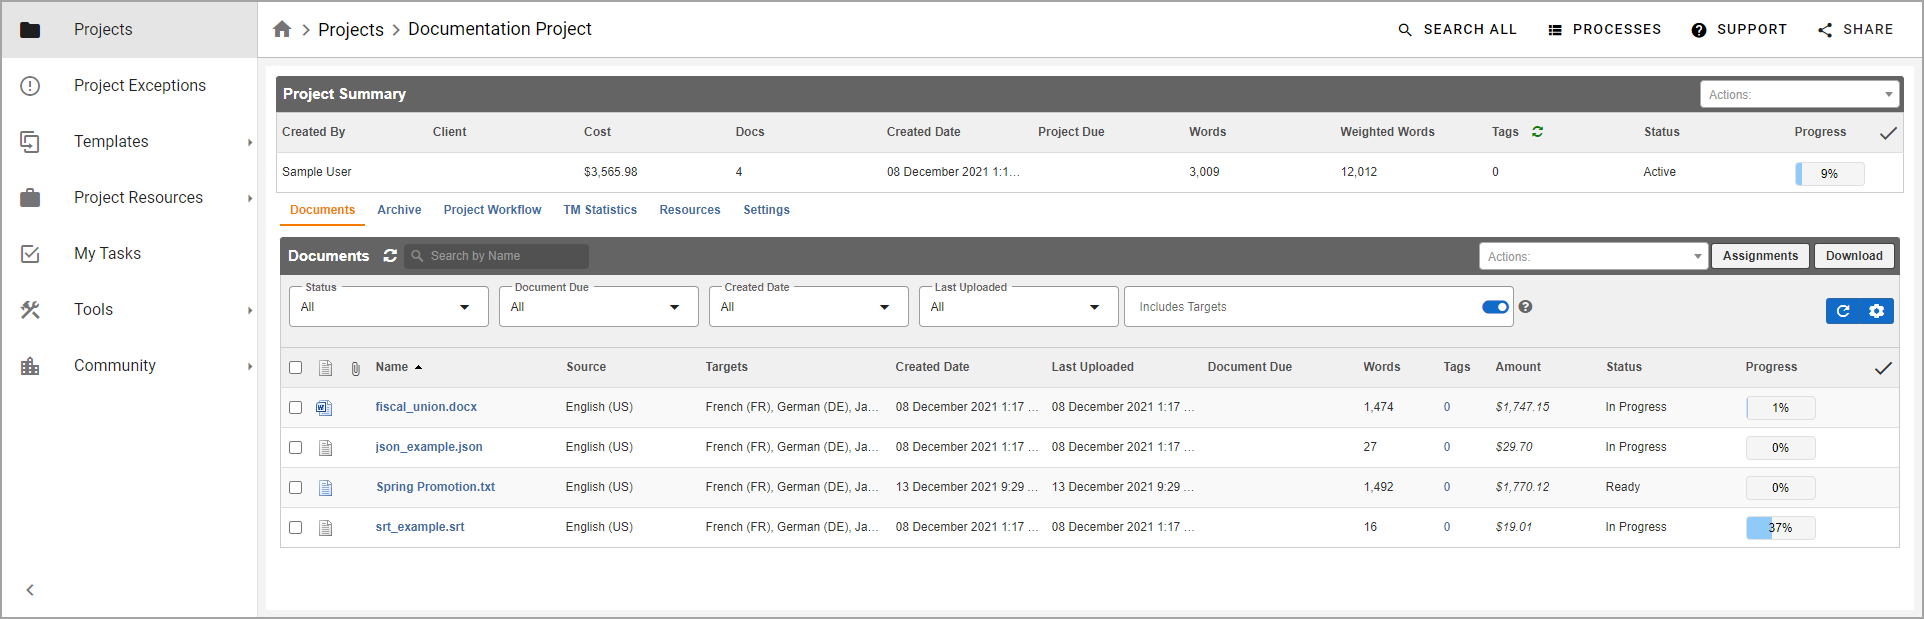
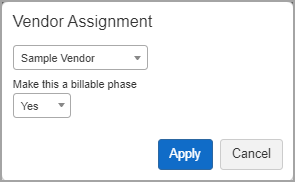
Edit vendor assignments
You can make changes to vendor assignments on phases in a project workflow phase after documents have been are uploaded by accessing to the targets tab.
Access the Targets tab of a document.Select the vendor assignment on the phase row you want to edit.
system.
To edit vendor assignments in the Project app, follow these steps:
On the Project Summary page, click the Documents tab, and then click the target in the Targets column of the applicable document.
When the Targets tab opens, click the vendor in the Vendor column to open the Vendor Assignment window.
In Vendor Assignment, select the vendor you want to assign the phase to, and then click Apply.
Take note of the following details:
| Panel | ||
|---|---|---|
| ||
|
|
|
Vendor assignments that are not eligible for changes will not be selectable.
Use the dropdowns to change or remove the vendor assigned to the phase and to determine whether or not it the phase should be billable.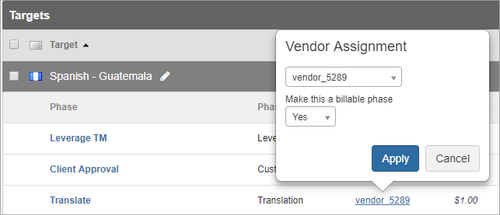
note
|
|
|
| Live Search | ||||||
|---|---|---|---|---|---|---|
|
This page is for:
| Status | ||
|---|---|---|
|
| Status | ||||
|---|---|---|---|---|
|
On this page:
| Table of Contents | ||||
|---|---|---|---|---|
|
Need Support?
Visit the
Lingotek| Style |
|---|
#children-section {        display:none !important;    }
#comments-section {        display:none !important;    }
#likes-and-labels-container {        display:none !important;    }
.page-metadata {display:none;} |