Prerequisites
Before you can start receiving the benefits of the Vendor app, you need to make some changes to your environment in the Project Management app. Before you do so, please ensure the following steps have been completed in Vendor.
- You have selected the currency that will be used when managing your finances.
You have at least one LSP listed in your Vendor Dashboard.
If you do not see any LSPs listed, or you wish to add more LSPs, please reach out to support@lingotek.com.
- Your vendor(s) have created rate charts. You can see this under the Vendor Details page, or under the Rate Chart list.
Project Management App
If the two steps above are complete, you can take a few simple steps to enable financial management in the Project Management and Vendor applications.
Workflow Changes
If you have not created any workflows, use the documentation to create some workflows. Note that the Vendor Management app requires your workflow to include a Leverage TM phase to generate costs.
If you want to update a Workflow template on a project, note that existing documents will not be updated with new Vendor assignments or marking the phase as billable. It will only apply to new documents.
- Leverage TM Phase - You must add a new workflow rule to the Leverage TM Phase.
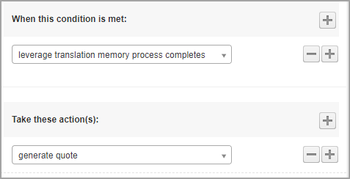
- Condition - leverage translation memory process completes
- Action - generate quote.
- Adding Vendors
Any language pairs that will be completed by an LSP should have a vendor assigned. First, assign your default vendor and default billable status. For Custom Phases only, you also specify if time spent should be used to populate the billable hours of a phase.

If you add language pairs to a document that are not specified by the workflow using Document Actions or APIs, the system will assign that language pair to your Default Vendor with the Default Billable status.
Assign vendors to each language pair in the Workflow as desired. Use the default value in the dropdown to match your default vendor and default billable status. For Custom Phases only, you can also decide for each language pair if you want to use the time spent for the billable hours of a phase, or simply have them reference the default setting.
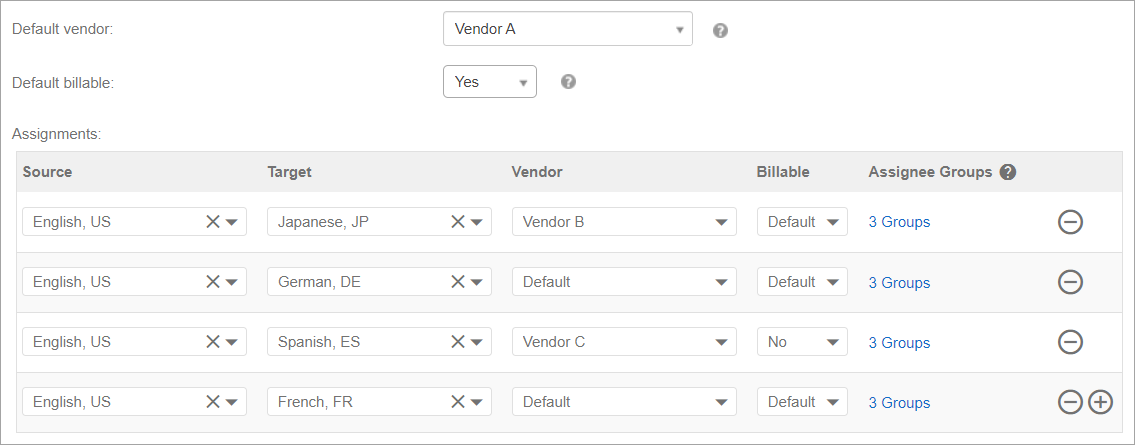
The options in the Vendor column include:
- Default Vendor
- No vendor assigned
- All the vendors with whom you have a client/vendor relationship
Note that if your default vendor is equal to No Vendor Assigned and your target vendor equals Default Vendor, that target will not have a vendor assigned.
- Mark phases invoiceable
- The Invoice Report looks for invoiceable phases when it is running the report. Only billable phases can be marked as invoiceable and they become invoiceable in one of two ways.
- When the document the phase belongs to has entered a completed status OR
- A billable phase has completed and has been marked invoiceable using the workflow rules described below.
- Use the following rules in the workflow to mark your billable phases as invoiceable:
- mark phase as invoiceable
- mark all previous billable phases as invoiceable
mark all billable phases as invoiceable
These rules are not required. They can be used to let vendors bill once their part in the workflow is done or to prevent bottleneck phases from slowing down the invoicing process. If they are not used, billable phases will be marked invoiceable when the document completes. Note: These rules can be run on the translation completed step of the workflow if you wish to let the vendor bill once the target has completed.
- The Invoice Report looks for invoiceable phases when it is running the report. Only billable phases can be marked as invoiceable and they become invoiceable in one of two ways.
Amount Column
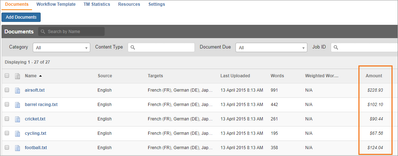
For your convenience, you will receive an estimate of the costs for phases, targets and documents in the Project application.
Custom phases will initially display the quoted cost using the quote settings in the matched rate chart. Those costs will be updated when the linguist or project manager enters the billable hours.
- Configure your columns in the document and targets list to view the Amount column.
- If you hover over cost estimates, you will see the cost information broken down by translation cost and project management fees.
Once the vendor runs a final invoice report, the phases, targets and documents in the report will be marked and Invoiced. The amount in the Cost column becomes bold and show the final cost of the documents, targets, and phases.
Edit Vendor Assignments
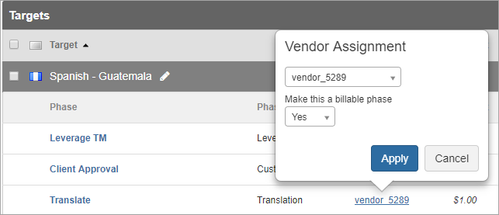
You can make changes to vendor assignments on phases after documents have been uploaded by accessing the targets tab.
- Access the Targets tab of a document.
Select the vendor assignment on the phase row you want to edit.
You can only make vendor assignment changes when the phase:
- has not been worked on by a linguist.
- has not entered into a completed state. (Completed, Late, Skipped, Cancelled)
Vendor assignments that are not eligible for changes will not be selectable.
Use the dropdowns to change or remove the vendor assigned to the phase and to determine whether or not it the phase should be billable.
Changing the vendor assignment on the phase will also remove all linguists and teams from the assignee pool to prevent linguists working for the old vendor from being able to work on tasks assigned to the new vendor.