| Info |
|---|
Communities in Lingotek Lingotek organizes all users for a single organization into a Community. Communities generally consist of Linguists, Project Managers, and Community Administrators. |
| Excerpt |
|---|
Adding Community Members (Full PMs and Community Admins)To add new community members,
New User With the New User tab the Community Admin can choose to send an invite or to simply add a user. To send an invite: 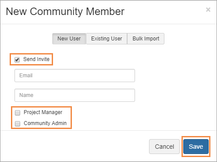
If you do not wish to send an invitation: 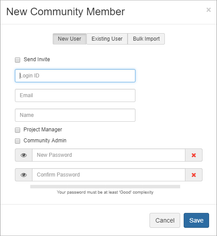
The user will be sent an email with their username and password. They will also be prompted to change their password the first time they login. Existing User An existing user is someone who belongs to the Community Admin's organization but does not belong to the community they are inviting them to. 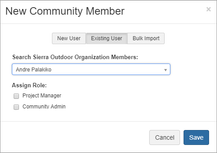
Bulk Import 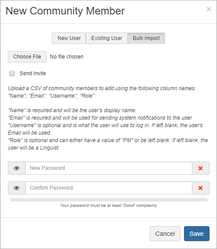
Adding Community Members - Vendor Project ManagerVendor Project Managers can:
Existing User A vendor PM can only add users who are members of their default organization. 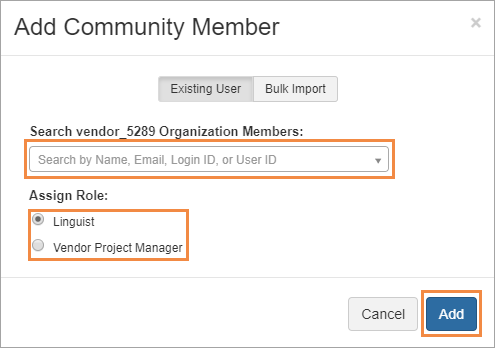
Bulk Import
|
Community Roles
Linguist permissions are available to all users. Linguists can access the translator workbench and any tasks assigned to them.
Project Managers can add users, manage/create projects, teams, workflows, and reports.
Community Admins can add users, adjust global settings, and monitor and manage community activity.
Overview
In Lingotek, users are organized through Communities. In a community, users are grouped according to three general types: linguists, project managers, and community administrators.
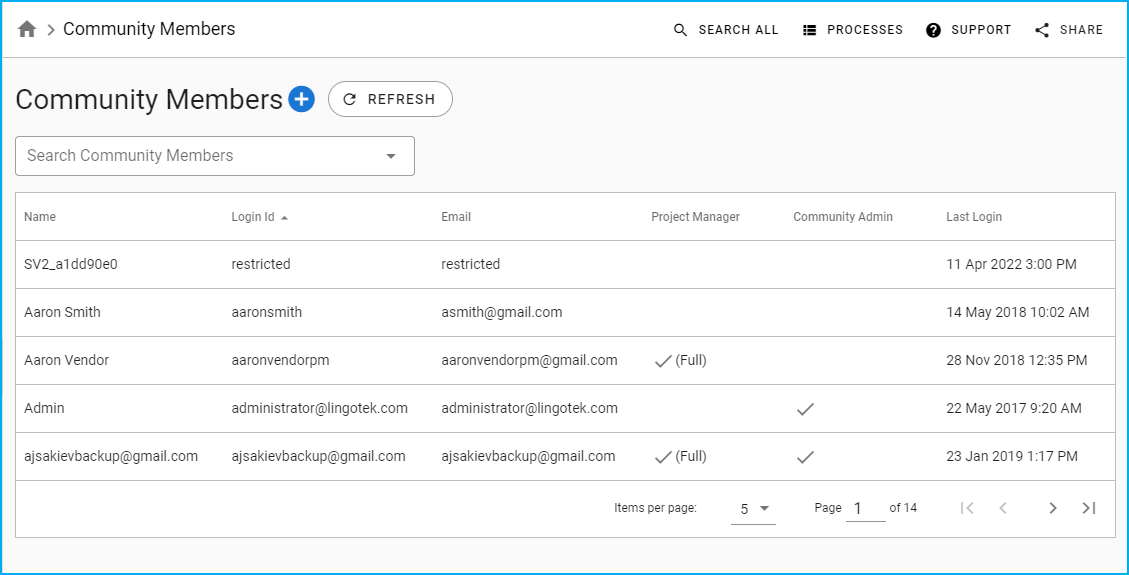
On the Community Member page, you can search for specific community members, and then view details such as their roles and the team they belong to, their team lead, and other related information. To access this page, click Projects > Community > Community Members.
This page is only available to community admins unless you have allowed project managers to manage community members in your community settings.
Actions
You can perform the following in this section of the app:
Search a member
To search for a member from your community, enter the name of the user in the Search Community Members box, and when name suggestions appear, click the applicable user.
The Community Member Details page will open where you can access the details of the user.
Add a member
To know how to add members to your community, visit the Add Users to TMS page.
Refresh user list
Click the Refresh option in the upper pane, beside the plus symbol, to refresh the list of users on the page.
Community Roles
The following are community roles in the TMS:
Linguist permissions are available to all users. Linguists can access the translator workbench and any tasks assigned to them.
Project Managers (PM) can add users, and manage or create projects, teams, workflows, and reports.
Community Admins can add users, adjust global settings, and monitor and manage community activity.
Visit the Roles and Access page to know more about these roles and the features they can access.
Community Member Details
The Community Member Details page opens when you click a TMS user.
This page is accessible to PMs and Admins only.

Member Details and Roles
In the Member Details and Community Roles section, you can view the following information:
Member Details:
Name - The registered name of the user.
Login ID - The email address of the user.
Status - The status of the selected user.
If you’re an administrator or a project manager, you can click DEACTIVATE to deactivate the user’s account in your community.Login Enabled - The login access status of the user.
Email - The user’s email address used to access the account.
User ID - The user’s ID number.
User UUID - The user’s UUID in TMS.
Parent Organization - The parent organization or community where the user belongs.
Parent Organization ID - The UUID of the organization.
Community Roles:
If you’re a PM or an admin, you can modify an ordinary user’s role in the community. You can add or remove a user from the following roles:
Community Member
Project Manager
Community Admin
Assigned Teams
In the Assigned Teams section, you can perform the following:
Assign a user to a team - From the Assign to team list, select the team you want to add the user to. You can add the user to as many teams as you like. The user will be added to those teams automatically.
Remove a user from a team - Click the REMOVE FROM TEAM option to remove the user from a team.
Select a new team leader - Click the CHANGE TEAM LEADER option to select another user as the leader for the team.
To know more about how teams work in TMS, visit the Teams page.
On this page:
| Table of Contents | ||||
|---|---|---|---|---|
|
Related Pages:
| Page Tree | ||||
|---|---|---|---|---|
|
Need Support?
Visit the Lingotek Support Center.