How to manage an existing Glossary
After a Glossary has been created, you can view and edit the entries in the Glossary.
Go to the Project Resources menu from the sidebar menu and select Glossaries.Click on the name of the glossary you wish to manage.
This will take you to the Glossary Summary page, from here you can manage the glossary by:Selecting the language of the entry you wish to manage.
Overview
This page walks you through the steps in managing concepts and terms in the TMS. Concepts are also referred to as glossary entries.
Access concepts and terms
To access and manage existing entries and concepts in the TMS, follow these steps:
Click the Project Resources from the sidebar, and then click Glossaries.
On the Glossaries page, select the glossary you want to manage.
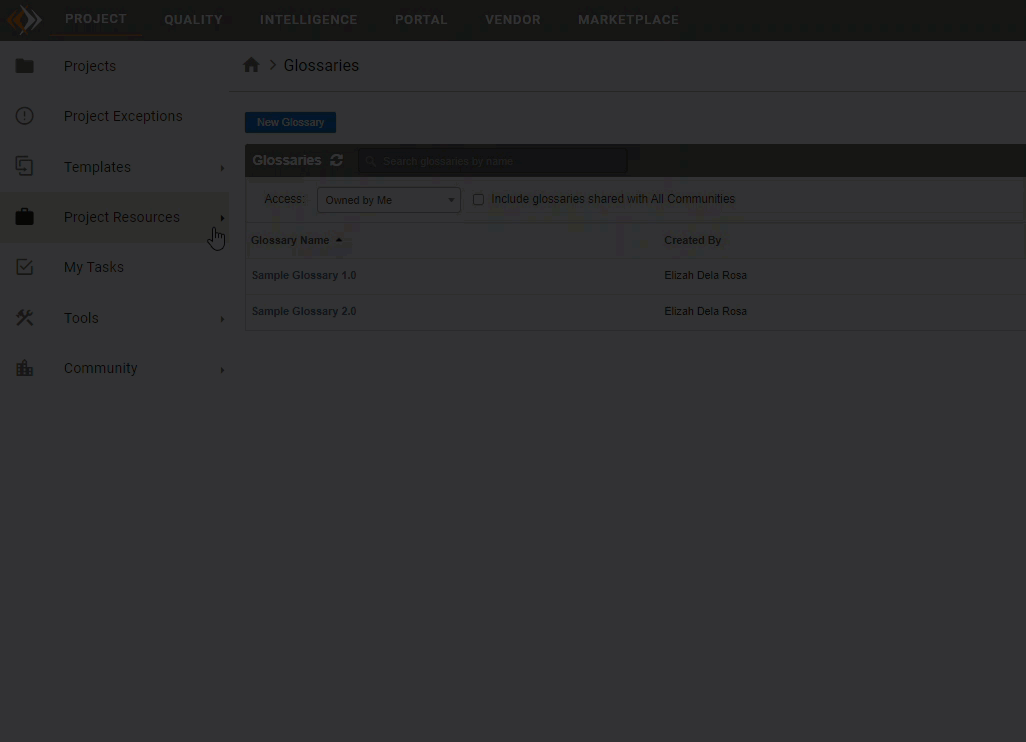
On the summary page of the selected glossary, choose the language of the entry you want to manage.
| Info |
|---|
You can select a full locale (both language and country) |
when filtering |
entries. |
Doing this will show you all the entries the selected language is associated with. |
After you select a language or locale, you can |
now search for entries, and manage and delete |
Searching Entries
After you select a Language, enter a term you wish to search for into the Search for Entries box.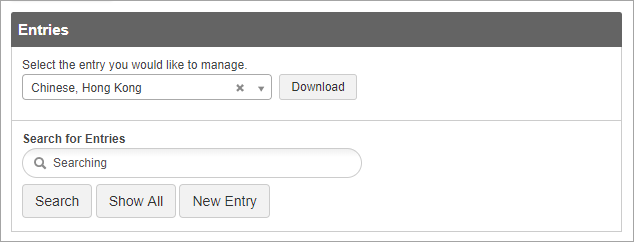
Press Search (or press the enter key).
After searching press
its concepts and terms. |
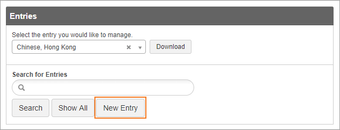
Search for existing concepts or entries
To search for concepts or entries, follow these steps:
On the summary page of a glossary, select the locale of the concept you want to look for.
In the Search for Entries box, enter the concept’s full phrase or a portion of its phrase, and then click the Search option.

| Info |
|---|
Click Show All to show all related entries |
if the |
Adding Entries
Select a language and then press New Entry.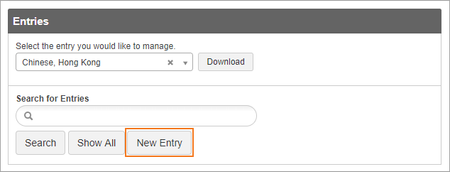
Enter a Concept Definition.
Enter the Term Text:
Click Add.
Notice it says Added (pending).
initial search results don’t feature the entry you’re looking for. |
Add an entry to your glossary
To add a new entry, follow these steps:
On the summary page of a glossary, select the language or locale of the concept you want to look for.
Click the New Entry option.
When the New Entry window opens, enter the following:
Concept Definition - Enter the concept definition.
Term Text - Enter the term’s applicable text.
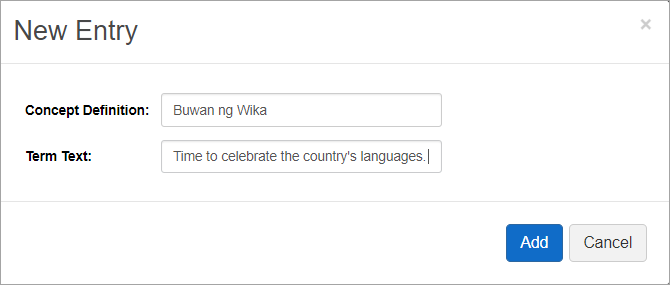
Click Add.
| Info |
|---|
When the “Added (pending)” message appears, do not click the Add option again to avoid duplicates. The system automatically adds the new entry and it will appear in the list after you refresh the page. You can also click Show All to view all existing glossary entries for the selected language or locale. |
Delete an entry
An Entry is the summation of a Concept and the Terms related to the Concept. The most important part of an Entry is the Concept, so deleting the Concept also deletes the Entry.
To delete an entry, follow these steps:
Click
an entry you
want to delete.
When the entry’s details appear on the right
Choose Delete Concept under under Concept Actions.
You will be asked to confirm that you want to delete the Concept
, click the hamburger menu to open the CONCEPT ACTIONS list.
Select the Delete Concept option.
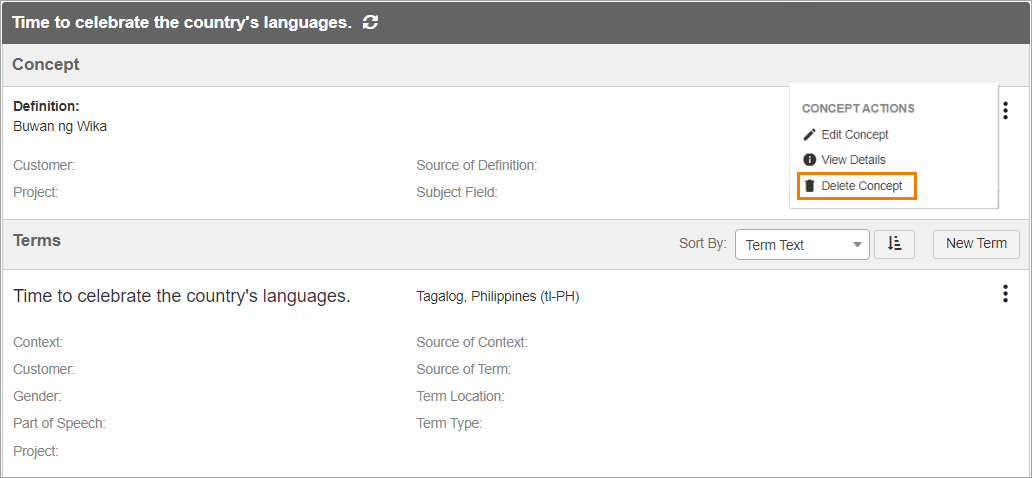
When the confirmation question appears, click Delete to delete the concept and all of its terms.
Edit a concept
A true concept-based Glossary glossary is more than a word in the source being translated into a specific word in another language. It is a list of terms that match a definition and other metadata in as many languages as necessary.
Managing Concepts
Select the desired EntryTo edit a concept, follow these steps:
Select an entry that you want to edit to open the Concept and
Terms sections on the right side.
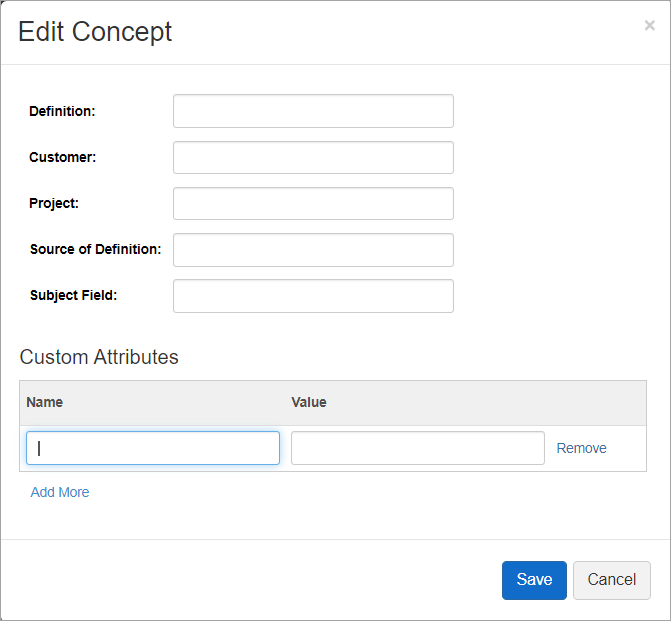
You should have already set a definition for your concept when you created a New Entry, but you can edit the definition and set more attributes by selecting the Actions ellipsis and selecting Edit Concept. In the Edit Concept modal you can:
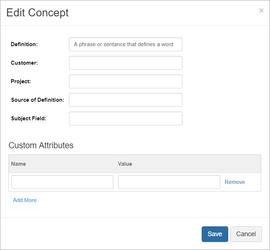
Click the hamburger menu from the Concept section to open the CONCEPT ACTIONS list, and then click Edit Concept.
When the Edit Concept window opens, enter the following:
Definition - The definition that was previously set appears in this box. Revise the definition as you see fit.
Customer - Enter the intended customer for the concept.
Project - Enter a specific project where the concept should be used for.
Source of Definition
- Enter the source of the definition.
Subject Field - Enter the subject field of the concept.
Custom Attributes - Click the Add More option to add customized attributes for the concept.
Click Save to save the changes.
Manage terms in a concept
Terms are the words you want to be used for specific locales based on the concept definition. You can have synonyms (i.e. multiple terms for one locale) which you can distinguish by defining metadata on the terms.
Adding Terms
Select the desired Entry to opennew term
To add new terms, follow these steps:
Select an entry or concept for which you want to add a new term.
When the Concept and
Choose New Term from the Term section header.
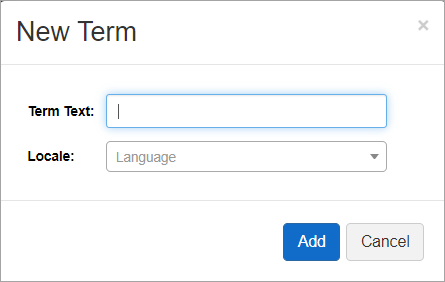
A modal will appear where you can set
Terms sections on the right side appear, click New Term.
When the New Term window appears, enter the term text and the locale in the Term Text and

Locale boxes respectively.
| Info |
|---|
A term can be associated with a language or a full locale (language and country) |
Edit Terms
Select the desired Entry to open the Concept and list of Terms.Scroll to find
. |
4. Click Add.
Edit a term
To edit a term, follow these steps:
Select an entry or concept for which you want to add a new term.
When the Concept and Terms sections on the right side appear, click the term you want to edit.
| Tip |
|---|
Pro Tip: Sort by Locale or Term to make the term you are looking for easier to find. |
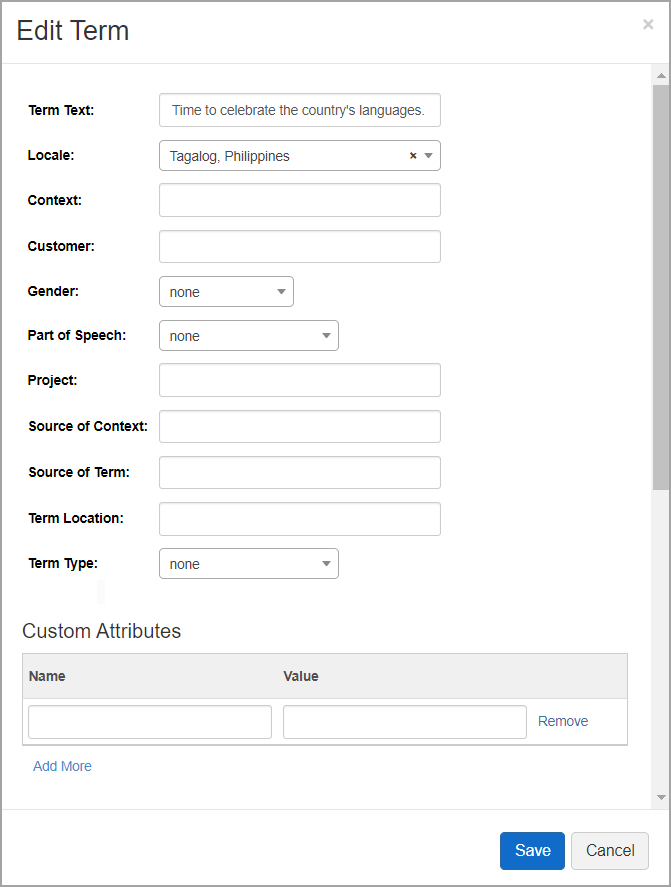
A modal will appear where you can:

- Change the Term Text
- Change the Locale
- Add Context
- Specify a Customer
- Set the Gender of the word
- none
- feminine
- masculine
- neuter
- other
- Specify the Part of Speech
- none
- adjective
- adverb
- noun
- other
- proper noun
- verb
- Determine what the Project should be
- Identify the Source of Context
- Identify the Source of Term
- Give the Term Location
- Select the Term Type
- none
- abbreviation
- acronym
- full form
- phrase
- short form
- variant
- Add as many other custom attributes you want.
Deleting Concepts
Select the desired Entry to open the Concept and list of Terms.From the Actions drop-down select Delete Term.
| Live Search | ||||||
|---|---|---|---|---|---|---|
|
3. Click the hamburger menu to open the TERM ACTIONS list, and then select the Edit Term option.
4. When the Edit Term window opens, supply the necessary information for the following:
Term Text - Revise the term text as you see fit.
Locale - Select the applicable locale or language.
Context - Enter the context when the term can be used.
Customer - Enter the intended customer for the term.
Gender - Select the applicable gender of the term.
Part of Speech - Select the applicable part of speech where the term belongs.
Project - Enter the intended project of the term.
Source of Context - Enter the term’s source of context.
Source of Term - Enter the term’s source.
Term Location - Provide the term location.
Term Type - Select the applicable classification of the term.
Custom Attributes - Click the Add More option to add customized attributes for the term.
5. Click Save to save the changes.
Delete a term
To delete a term, follow these steps:
Select an entry or concept for which you want to add a new term.
Click the hamburger menu from the Terms section to open the TERMS ACTIONS list, and then click Delete Term.
When the confirmation question appears, reassess if you want to delete the term, and then click Delete to erase it from the system.
| Style |
|---|
#children-section {        display:none !important;    }
#comments-section {        display:none !important;    }
#likes-and-labels-container {        display:none !important;    }
.page-metadata {display:none;} |