Format Tags (Legacy)
Applying Format Tags
During the translation process, you may encounter formatting (e.g. bold, italic, underlined), displayed as tags in the Original Text.
To apply a format tag from the Original Text to the Current Translation,
Find the text needs to be formatted in the Current Translation pane and highlight it.
In the Source, double-click the format tag you wish to apply.
The new tag will be applied to the highlighted text.
Be sure to Save your work.
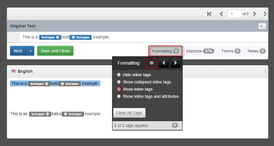
If you don't see format tags, they may be hidden.
To turn them on, click...
| ...Formatting > Gear Icon > Show inline tags. | or | ...Tag Icon </>, Gear Icon, Show inline tags. |
 |
|
Apply Next Tag
Quickly and easily apply tags with Alt, Shift, Insert. This shortcut will apply tags in the order they appear in the Original Text.
- Using your keyboard, highlight some text in the translation. Then press Alt, Shift, Insert. This will apply the first tag to the highlighted text.
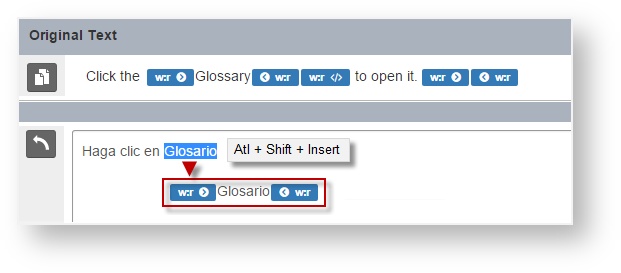
- Highlight the text needing the next tag. Press Alt, Shift, Insert. This will apply the next tag to the highlighted text.
- Continue until all tags have been applied.
- Be sure to Save your work.
Tag Colors and Symbols
The tags that are applied will have different colors/symbols depending on the type of tag as well as how the tag was applied.
- Blue tags - open/close tag pairs

- Black tags - self-closing tags

- Red tags - the tag was applied improperly.

- An opening tag was applied without the matching closing pair.
- The closing tag was applied before the opening tag.
- If open and closing tags are split by segments (ex: The opening tag is in segment 1 and the closing tag is in segment 2) they will still be blue with the have a self-closing icon.
