Overview
On the reports Reports tab, LSPs language service providers (LSP) have access to the Cost Details, Invoice Invoice, and Linguist reports Linguist reports. These reports, which you can export as .csv files and are made up of rows of individual phases. To help you understand the Invoice report, we have provided more details below.
Cost Reports
The Cost report's purpose is to give the vendor, show costs and charges for each step of the translation workflow. The invoice also includes a summarized PDF version of the CSV file.
Cost Details Reports
This report includes all the phases that are assigned to the vendor or LSP who’s running the report.
The purpose of the Cost Details report is to give both the translation buyer and the Language Service Provider (LSP) an estimate of costs for a project within a specific time period.
It shows accurate Cost Details show costs for phases that are billed based on word count but only provides quotes for hourly costsand hours spent.
Cost reports This report can return phases that are completed or in progress in the TMS.
All phases that belong to targets that have at least completed the Leverage TM phase may Any phase that generates cost can be included in the Cost reportthis report.
Invoices
With the Invoice report, LSPs can quickly invoice their client.
The Cost Invoice report only returns includes phases that are assigned ready to the vendor running the cost report.
Invoice Reports
Invoice reports are meant to give clients and vendors accurate cost information on invoiceable workbe invoiced based on the workflow rules.
Phases must be invoiceable to cannot be invoiced twice so once a phase is invoiced, it will not be included in the Invoice report. any other invoice.
Linguist Reports
The Linguist Report shows the real amount of work completed on a task based on segment data. This means that two or more linguists can work on a single phase and have their work reflected in this report.
LSPs see the real user name in the Responsible User column instead of the alias.
Generate Reports
To create generate a report,
Log into the Lingotek Vendor app.
On the left, select the Reports tab and make sure Invoice Reports is highlighted in the sidebar.
On the right, click the + icon.
Cost Reports
Date Range - Limited to two months.
Client - select the client you want to run the report for.
Complete the dialog. Select a date range and apply filters as desired.
When you are ready, click Create.
A new report will display on the reports list. On the far right, hover over the report Amount (displayed on the far right) to display the More
 icon.
icon.Click the More
icon and select Download.The report will be added to your browser’s Downloads folder.
Invoice Reports
Date Range - Limited to two months.
Type of report - Invoice reports give you two options.
Draft Report - The draft report includes phases that became invoiceable within the selected date range but have not yet been invoiced.
Final Report - The final report will include phases that became invoiceable within the selected date range but have not yet been invoiced. The final invoice report will also mark the phases included in its report as 'invoiced' in the vendor database and the Project application's UI.
follow these steps:
Open the Vendor application.
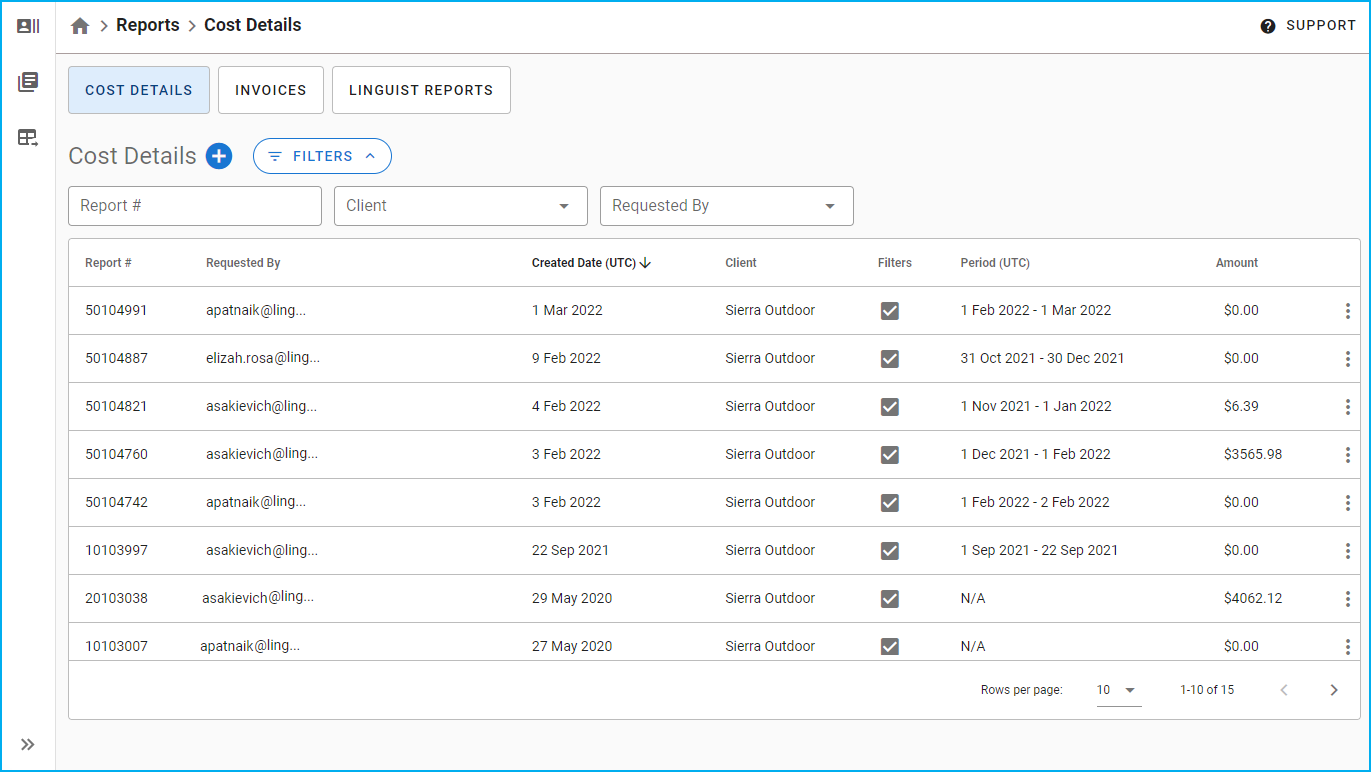
In the left sidebar, click Reports.
When the Reports page opens, click either the COST DETAILS, INVOICES, or LINGUIST REPORTS tab in the upper pane and then click the add symbol beside the page heading.
Cost Details Report
To generate a Cost Details report, follow these steps:
Click the COST DETAILS tab on the Reports page of the Vendor application.
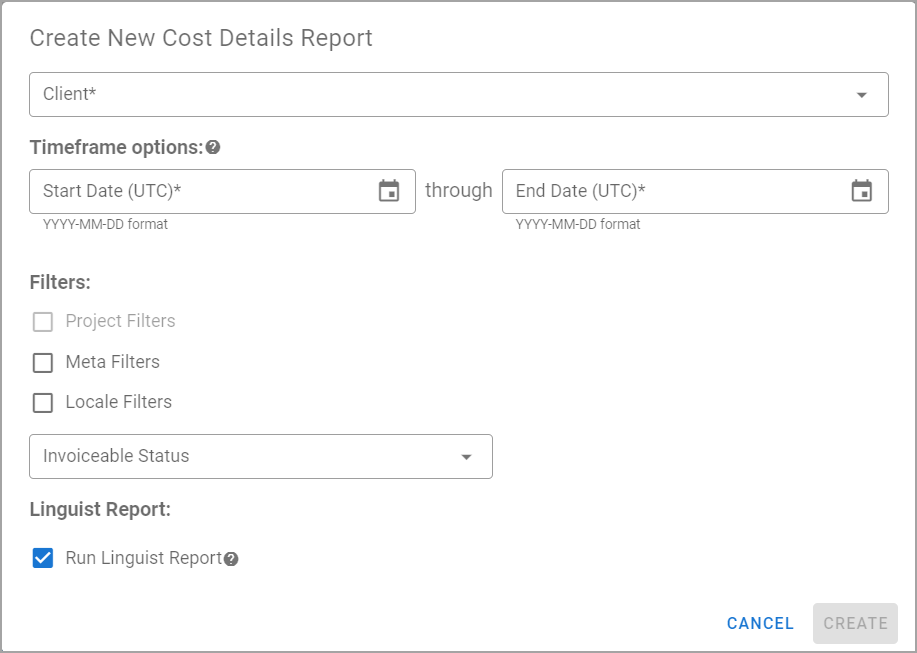
When the Create New Cost Details Report window opens, enter the following details:
Client - Select the applicable client whose cost details you want to see.
Timeframe Options - Enter the time frame with which you want to generate an invoice. You can review records within a two-month time frame.
Filters - Select the applicable options that you want to filter your report by.
Invoiceable Status - From the Invoiceable Status list, select any of the following:
Invoiced - Filter phases where you have invoiced or billed your client.
Invoiceable - Filter phases that are ready to be invoiced.
Not Invoiceable - Filter phases that are currently ongoing or haven’t been started yet.
Click CREATE.
| Info |
|---|
The system generates a report according to the vendor’s selected preferences. To access the report, click the hamburger menu in the right-most column of the applicable report, and then click Download. The report is stored in your local downloads folder. |

Invoice Report
Continuous – To generate an invoice for continuous project types, follow these steps:
Click the INVOICES tab.
When the Create New Invoices Report window opens, enter the following:
Client - Select the applicable client you want to create an invoice for.
Project Type - Select the Continous Projects option.
Timeframe options - Enter the time frame with which you want to generate an invoice. You can review records within a two-month range.
Filters- Select the applicable options that you want to filter your report with.
Click CREATE.
Scoped – To generate an invoice for scoped project types, follow these steps:
Click the INVOICES tab.
When the Create New Invoices Report window opens, enter the following:
Client - Select the applicable client you want to create an invoice for.
Project Types - Select the Scoped Projects option.
Select Projects - Select the applicable projects that you want to create an invoice of. A separate invoice will be run for each project you select.
Click Create.
| Info |
|---|
The system generates an invoice according to the vendor’s selected preferences. To access the file, click the hamburger menu in the right-most column for the applicable invoice, and then click Download. The report is stored in your local downloads folder. You can also generate a linguist report with the same parameters as the invoice report you are currently |
generating. This linguist report will start immediately after the invoice report completes. |
When you are ready, click Create.
A new report will display on the reports list. On the far right, hover over the report Amount (displayed on the far right) to display the More ![]() icon.
icon.
Click the More ![]() icon and select Download.
icon and select Download.
Select the Run Linguist Report checkbox to generate the report. |
Linguist Report
To create a Linguist Report follow the same steps as above. With the following exceptions:
Select Linguist Reports in the sidebar.
The modal does not include the type of report or the option to automatically run another report.
When you are ready, click Create.
A new report will display on the reports list. On the far right, hover over the report Amount (displayed on the far right) to display the More
icon.Click the More
icon and select Download.The report will be added to your browser’s Downloads folder.
Filters
Cost and Invoice reports can be filtered by report, follow these steps:
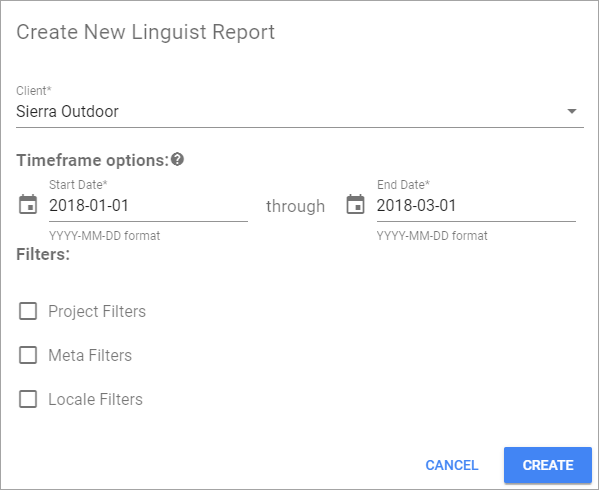
Select the LINGUIST REPORTS tab, and then click the plus symbol beside Linguist Reports.
When the Create New Linguist Report window opens, enter the following information:
Client - Select the applicable client.
Timeframe options - Enter the time frame with which you want to generate a report. You can review records within a two-month range.
Filters- Select the applicable filter options.
Click CREATE.
| Info |
|---|
The system generates a Linguist report according to the vendor’s selected preferences. To access the file, click the hamburger menu in the right-most column for the applicable report, and then click Download. The report is stored in your local downloads folder. |
Filters
The Cost Details, Invoice, and Linguist reports can be filtered according to projects, metadata, and language pairs.
You must select a client before using the projectThe following are the available filters:
Project Filters - Filter results according to projects. You must first select a vendor before using this filter. You can
use several projects
as filters, as long as they have at least one phase that is assigned to your vendor organization.
Meta Filters - Filter results according to a project’s metadata. Note that targets will only be
accounted for if they match all metadata listed in the filter.
Filter on as many language pairs as desired, any target that matches any of the language pairs will be returned. 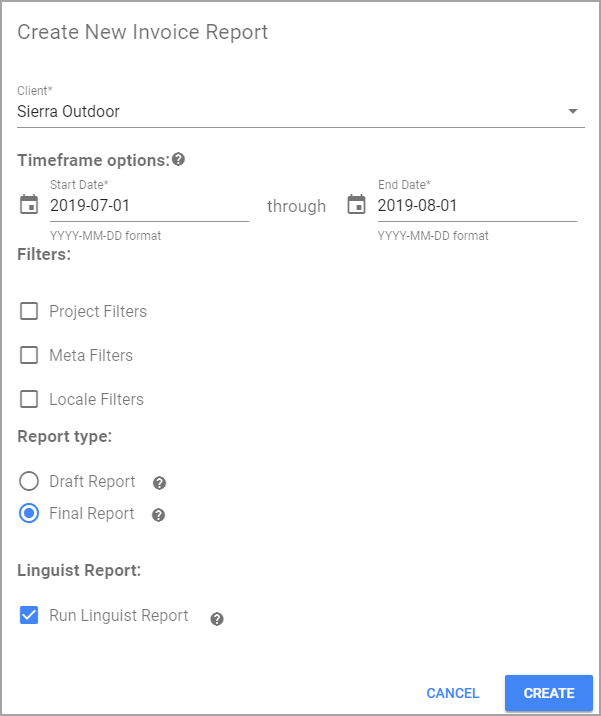
Locale Filters - Filter results according to language or locale pairings. Targets that match the selected language pairs are included in the report.

Search Reports
Use the search box in the upper-right corner to search by for existing reports. Enter any of the following search criteria:
Report # - In the Report #
Type
Vendor
Date
Amount
Download, Archive, Delete Reports
Log into the Lingotek Vendor app.
box, enter the number of the existing report.
Client - From the Client list, select the applicable client the report is created for.
Requested By - From the Requested By list, select the email of the applicable report requester.
These filters are available for all three reports.
Download and Delete Reports
To download or delete reports, follow these steps:
Log in to the Vendor app.
In the left sidebar, click the Reports tab, and then select the type of report you wish to manage.
In the
right-most column,
click the hamburger menu, and then select the process you want to perform.
| Excerpt |
|---|
Notes on Exported Reports
|
This page is for:
| Status | ||
|---|---|---|
|
| Status | ||||
|---|---|---|---|---|
|
On this page:
| Table of Contents |
|---|