The Lingotek Inside Magento extension enables you to translate product content within your Magento store views. Product titles, descriptions, and other content can be translated as well as SEO metadata. Lingotek Inside Magento can meet all your translation needs.
View Installation GIF:
First, install the Lingotek Inside Magento extension as you would any other extension. After installation, you’ll notice the top-level menu item for Lingotek.

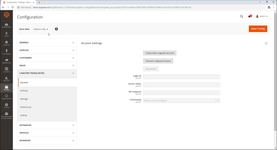
Next, click on “Account” to connect Lingotek. You may create a new Lingotek account or sign into an existing Lingotek.

If you choose to create a new account, you’ll be taken to Lingotek’s account creation page.

If you choose to connect a Lingotek or Sandbox account, you’ll be taken to Lingotek’s single sign-on page. After correctly signing in, you’ll be redirected back to your Magento 2 environment saving a Lingotek OAuth 2 token.
Next, select the Lingotek community to connect within your Magento 2 environment, and click “Save Config”.

7. Select your default settings by clicking on “Defaults.”

The “Upload Content” field describes the default behavior for uploading Magento content. The “Download Translations” field supplies the default behavior for downloading translations. If these fields are set to “Automatic,” content will be uploaded or downloaded automatically to your Magento environment.
The “Default Project” field describes which Lingotek project within the TMS (Translation Management System) your Magento content will reside in by default.
The “Default Workflow” describes which workflow your Magento content will use by default. Workflows define processing steps your content undergoes, and can contain machine translation, in-context review, etc.
The “Primary Filter” and “Secondary Filter” fields describe filters applied to your content as it is uploaded to Lingotek. Filters can manipulate your Magento content by removing or ignoring HTML tags, shortcodes, etc.
The “Refresh Resources” button performs an online call to Lingotek to pull down changes or newly created projects, workflows, or filters.
Next, click on “Manage” to view Lingotek management options. Select the profile you wish to use for products.

There are two existing profiles packaged with the Lingotek inside Magento extension: automatic and manual. The automatic profile uploads source documents and downloads translations automatically. If the manual profile is selected, uploading source documents and downloading translations must occur via user input.
You can also create, edit, or delete new Lingotek profiles. Click on the “View Profiles” button to perform these actions. The automatic and manual profiles cannot be deleted.

Lingotek profiles define automatic or manual uploading of documents, and automatic or manual downloading of translations, as well as Lingotek projects, workflows, and filters. Profiles give Magento users more granular control in the translation process. Each profile can have different projects, workflows, and filters.

“Target Language Specific Settings” define even more granular control over the translation process. Each target translations can have a workflow and automatic download setting that only apply to that target language as translations progress through the process.

“Translation Target Languages” represents a table containing your stores and store views. Each link will forward you to that respective language setting for the store view. The Lingotek Inside Magento extension translates your content defined by store views. It is recommended to name your store views in a way that describes the locale they serve. Also, try to assign your store view a code that represent the locale they server, i. e. es_es for Spanish (Spain).


“Preferences” define specific options that Magento users can choose. “Delete documents from Lingotek TMS when disassociating” removes the document from the TMS after that document is disassociated.

The “Utilities” menu contains helpful utilities. The “Update URL” utility uploads a callback URL that the Lingotek TMS uses to notify your Magento environment when documents are finished uploading, when translations are ready, and when translation phases are complete.

Once you’ve created store views, and have selected translation languages for those store views, navigate to your products grid. You should see new “Source” and “Translations” columns.

Click a checkbox to select a product you wish to upload to Lingotek. Next, select the “Upload to Lingotek” action from the “Actions” pull-down menu.


Next, select “Check Source Document Status.” Once the document has been successfully uploaded to Lingotek, the source icon will be green.

Select the “Request Translations” action. The translations icons will become orange.

Select the “Check Translations Status” action. The target icons will become blue.

Select the “Download Translations” action. Your translations will download and the translation icons will be green.

Now navigate to your store views, and enjoy your translations!

Other translation states include Interim Ready, Interim, and Interim Edited. Interim Ready occurs when translations have not progressed through all translation steps, but are ready for download. Interim occurs when translations that have not progressed through all translation steps are downloaded. Interim Edited occurs when source content has been edited while translations are in either Interim Ready or Interim state.
Lingotek profiles can also be defined at the product level, within the product edit page.

You can disconnect from Lingotek at any time, but be aware that all your content will be disassociated from the Lingotek TMS.

Enjoy the Lingotek Inside Magento extension!
| Live Search | ||||||
|---|---|---|---|---|---|---|
|
Need Support?
Visit the Lingotek Support Center.