If your workflow uses a Leverage TM phase, be sure to designate which TM vault(s) it should use.
Select Language Resources
To choose which language resources to use for leveraging during the Leverage TM phase,
Open a workflow. (Go to Templates under the sidebar, click Workflow Templates and select the workflow you wish to edit).
Select the Leverage TM step from the Workflow preview.
Click the Configuration tab.
Scroll down to the “When the phase starts…” Rule (lower half of the page) and select the Edit icon (
 ).
). Scroll down to the Take these action(s) heading and check the box next to the language resource(s) you would like to include in the workflow (e.g. Check Search TM vaults…).
Choose whether to use the Project Resource TM Settings or specify them in the workflow itself.
If you choose to specify them in the workflow: drag and drop the language resources you wish to use for leverage to the right.
.
Search for specific vaults with the search box.
To remove a TM vault or glossary, simply drag and drop to the left.
Drag and drop to prioritize the Glossaries and TM Vaults in each list.
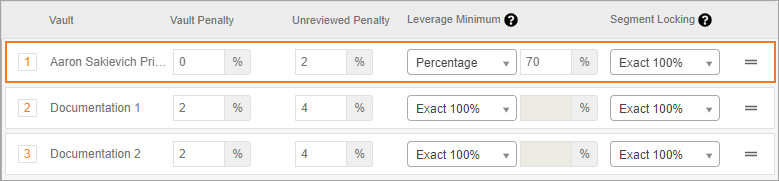
For each selected TM vault, be sure to choose the Leverage minimum and whether to lock Exact 100% and/or Syntax 100% matches.
Info - Leverage minimum determines which TM matches the match quality for TM matches that are pre-populated to the workbench.
Tip title Resources Tips
To remove a TM vault or glossary, simply drag and drop to the left.
Drag and drop to prioritize the Glossaries and TM Vaults in each list.
- We strongly recommend that you do not choose a leverage minimum percentage below 50%. The default percentage is 95%.
Locking matches will
- Set vault penalties and penalties for unreviewed TM units.
- Deselect targets under the Require Locale column that should match on language and ignore locale. This feature will make it so leverage and analysis process will ignore the locale of both the source and the target. The targets listed here are the ones you set up in the Document Tab under the Setup phase.
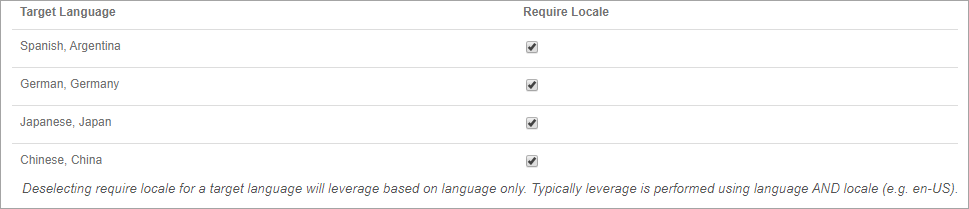
Info title ExampleDisabling "Require Locale" means leverage will ignore the country code of the source AND the target language when determining which TM unit to leverage to the segment rather than matching on the language and country code, which is the default. When you choose to disregard the country code, it will look for the highest, most recently created TM unit of matching languages. As an example, a document being translated from English, United Kingdom into Spanish, Spain may have TM units leveraged that have an English, United States source and a Spanish, Mexico locale if that TM unit was created sooner than another matching English, United Kingdom - Spanish, Spain TM unit.
- The targets listed here are the ones you set up in the Document Tab under the Setup phase.
- This feature is excellent for companies who are looking to save on costs and are not necessarily concerned with localizing content based on region.
Save your work to finalize your changes.
Once your work is saved, any document using this workflow will utilize the language resources you selected.
| Tip |
|---|
To change the TM Vault used in an active document, you will want to be sure to choose to Search TM Vaults as specified in the Project Resources Tab. Then you can modify the project resources at any time. |
| Live Search | ||||||
|---|---|---|---|---|---|---|
|
Related pages:
Need Support?
Visit the Lingotek Support Center.